Beolink 5000 Remote Controller
Manufactured: 1991 - 1996
Designer: David Lewis
Colours: Grey
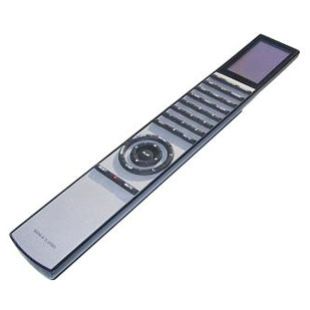
To keep up with Beolink's ability to move sound and picture not only from one product to another, but from one room to another, Bang & Olufsen developed remote control units capable of two-way interactive and visual communication. The handheld Beolink 5000 provided a visual display which helped guide you through every stage of an operation giving you visual feedback of each system's current status even when you were in a different room.
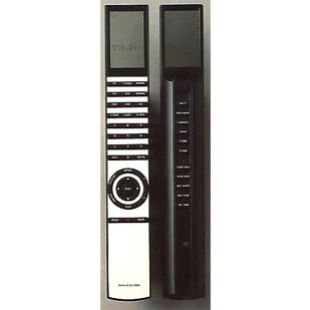
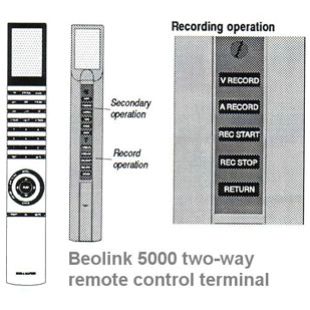
As the expanded capability of the terminal called for more operating buttons, Beolink 5000 had visual displays and operational buttons on both sides of the unit. Secondary-function buttons were recessed and placed to the rear while primary control buttons were positioned at the front.
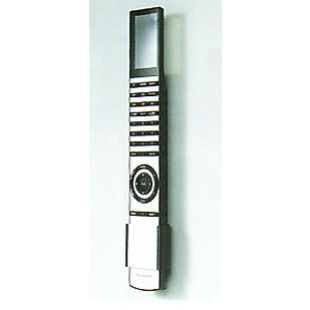
Beolink 5000 added a new dimension to Bang & Olufsen's remote control range in the early 1990's. A fascinating transparent display, with numbers and letters apparently hanging in mid-air kept you constantly informed about the status of the Bang & Olufsen equipment that you were either watching or listening to. The layout of the unit was similar to that of Beolink 1000. However, because of its expanded capability it called for more operating buttons. To maintain its slim design, these were found on both sides of the hand-held unit. At the front, under the visual display, were the source selection buttons. Below these were the multi-function buttons arranged in a circle and designed for easy thumb operation. The circle contained buttons for analogue operation and menu-operated functions; a total of eleven buttons.
On the back were the secondary function buttons such as programming and recording, recessed in a channel to help prevent accidental operation.
Beolink 5000 was the ideal terminal to use where extra speakers or a second television were linked to a central system in a different room. Its display gave you feedback about the system's current status to assist you in issuing your instructions.
It allowed you to fully utilise the timer recording, play and play next facilities on the Beosystem 4500 and Beocenter 9500. It was also particularly well-suited for Beosystem 2300. The remote control also maximised the programming capabilities of Beocord VX5000 video system and, via Beocenter 9500, allowed you to program LC1 and LC2 light control units.
Features
Beolink 5000 had the added benefit of a transparent display panel to guide users through complicated operations. Combining this display with fixed buttons which were positioned to provide a clear distinction between primary and secondary operations, allowed for simple and logical overall operation. The unit was light and slim, its display had low power consumption (LCD supertwist which produced map definition and detail even in bright sunlight) with a dot matrix display capacity of two lines, each with seven characters. The display could be read from either side of the handset dependant on which operations were carried out (to be read from either the back or the front).
Other important highlights of Beolink 5000 were:
Hand-held terminal for all video, audio and AV operation in central rooms and Local Control Systems
Two-way operation with display feedback
One-button source selection, video and audio
Logical layout with grouping of related functions
Secondary functions placed on the back to prevent inadvertent operation
Comprehensive secondary functions, e.g. record/time programming with display support and guidance
Companion infra-red remote control units that were available at the time of Beolink 5000's introduction, were Beolink 1000 and Beolink 7000.
Component features
Beolink 5000 was the key to TV and video systems of the early 1990s. It was recommended for operation of such TV/video packages as Video System 5500 or Video System 6000, because these systems contained numerous advanced functions, especially in the fields of recording- and timer-programming. Beolink 5000 was optimised for the operation of such complex functions where you were guided through the options via prompts on the display of the terminal.
The display responded whenever you activated a function. When you carried out a primary operation, e.g. selected a source, you received status feedback. The feedback was dynamic, i.e. it changed according to the operation you carried out and the subsequent response the terminal received from the system. An example of this was in the adjustment of sound, where the centre balance function was only displayed when the function was available at that time in the system.
When you were in the secondary operation mode, e.g. for recording and programming, the display acted as a menu for operation, i.e. it became an active part of the operation. Thus the display was a reassuring response to your actions when you were in the primary operation mode, and an active guide when you were in the secondary operation mode.
The display was transparent, because some of the operation where the display is an active part, was initiated on the back. One example of this is when you activated the RECORD buttons on the rear of the remote control, the display read out the appropriate cues as seen from the back of the terminal i.e. V.REC PAUSE and the source you selected for the recording.
As most of the timer programming procedure was by the circle buttons on the front of Beolink 5000, the display read out the appropriate cue seen from the front as soon as you activated the PROGRAM button in the back recess. In this way it prompted you to turn the Beolink 5000 around for the rest of the programming procedure.
The advanced functions available via the Beolink 5000 included e.g. clearing TV stations, or making advanced (timer) recordings on your Bang & Olufsen VCR. The hazard with the record and program functions of course is that you could by accident clear or erase programs that you'd already made e.g. a recording on a video tape. So it was vital that the advanced functions were kept separated from the other main functions. By placing the buttons for operation of the advanced functions on the back of the terminal, Bang & Olufsen were able both to extend the number of secondary functions, and to make timer operation a real asset without risking inadvertent operation and confusing clutter on the front. Beolink 5000 was the first hand-held Beolink terminal where timer operation was possible with all recommended systems and even in stand-by.
The buttons for recording were grouped in the back recess to preclude inadvertent recording. To further secure against the inadvertent start of a recording, it was necessary first to point out the recorder and secondly start the recording on a second button.
Recording operation was refined with the Beolink 5000: all record buttons are grouped in the recess, you could address two video recorders, and no matter which one you used, you had direct access to start or stop of the recording and to make a record return.
Once you had summoned the source you wanted to record on to the TV, all you had to do was to turn the Beolink 5000 around and activate the [V.RECORD][REC.START] sequence to initiate a simple recording.
If you wanted to make an advanced recording of a TV programme as a background job, in RECORD PAUSE you selected V.TAPE + the programme number on the front before starting the recording on the back. The REC STOP button was a useful refinement here. When you had commenced a recording and switched to another source, e.g. TV, [REC STOP] gave you direct and instant access to stop of the background recording.
The third record level, timer record, was also initiated on the back, by means of the PROGRAM button. Beolink 5000 allowed you to make the timer operation both when the system was playing and when it was in stand by. In this way you would not disturb other uses of the video system and you need not even switch the system on to make a timer programming.
Picture adjustment was shown on the TV screen, and not on the Beolink 5000. In this way you could monitor and judge the changes directly on the screen, e.g. with regard to contrast. Sound adjustments were displayed both on the screen and on the terminal. In this way the feedback was always placed at the optimal point for operation and adjustments.
Teletext contains a number of secondary functions to enhance its user value, such as enlarging the page, mixing Teletext with the TV program, revealing a hidden information (e.g. VPS information on TV program page), etc. Many users never access these secondary
functions, because they have been assigned low priority on the remote controls and therefore it is difficult to access them. Beolink 5000 accesses the functions easily and as guided by its transparent display. In TEXT-mode, if you pressed MENU the display would read out:
TEXT
MENU?
If the answer was 'yes' [PLAY] gave access to the first item of the menu, as shown here:
Secondary Teletext functions available via [MENU]:
MENU (Teletext time programming)
LARGE
MIX
REVEAL
UPDATE
SUBCODE
As an alternative you could step through the options or leave the menu. The menu operation procedure simplified access to the secondary Teletext functions considerably and showed the advantage of using two operation logics: one for routine operations and one for important, but rarely-used, operations.
Beolink 5000 was the key to video systems such as Video System 5500, comprising Beovision MX5500 and Beocord VX5500. It was recommended for operation of such systems because this system contained numerous advanced functions, especially in the fields of recording and timer programming. Beolink 5000 was optimised for the operation of such complex functions, where you are guided through the options via prompts on the display of the terminal. Other important highlights of Beolink 5000 were:
Hand-held terminal for all video, audio and AV operation in central rooms and Local Control Systems
Two-way operation with display feedback
One-button source selection, video and audio
Logical layout with grouping of related functions
Secondary functions placed on the back to prevent inadvertent operation
Comprehensive secondary functions, e.g. record/time programming with display support and guidance
The display responded whenever you activated a function. When you carried out a primary operation, e.g. the selection of a source, you received status feedback. The feedback was dynamic, i.e. it changed according to the operation you carried out and the subsequent response the terminal received from the system. An example of this was in the adjustment of sound, where the previously mentioned centre balance function was only displayed when the function was available in the system. When you were in the secondary operation mode, e.g. for recording and programming, the display acted as a menu for operation, i.e. it became an active part of the operation. Thus the display was a reassuring response to your action when you were in the primary operation mode and an active guide when you were in the secondary operation mode. The display of Beolink 5000 was transparent, because some of the operations where the display was an active part, was initiated on the back. One example of this was when you activated the RECORD buttons on the back when the display read out the appropriate cues as seen from the back of the terminal, i.e. V.REC PAUSE and the source which you had selected for the recording.
As most of the timer programming procedure was by way of the circular button on the front of Beolink 5000, the display read out the appropriate cue as seen from the front as soon as you activated the PROGRAM button in the back recess. this way it prompted you to turn the Beolink 5000 around for the rest of the programming procedure.
The advanced functions available via Beolink 5000 include e.g. clearing (satellite) TV stations, or making advanced (timer) recordings on your VX5500. The potential problem with record and program functions was that you could by accident clear or erase previously-recorded programmes. So with Beolink 5000 the advanced functions were kept separate from the other main functions. By placing the buttons for operation of the advanced functions on the back of the terminal, Bang & Olufsen were able both to extend the amount of secondary functions, and to make timer operation a real asset without risking inadvertent operation and confusing clutter on the front. Beolink 5000 was the first hand-held Beolink terminal where timer operation was possible with all recommended systems, even while in stand by.
The buttons for recording were grouped in the back recess to preclude inadvertent recording. To further secure against inadvertent start of a recording, it was necessary first to put the VCR into a recording pause mode before commencing the recording by way of a second button.
Recording operation was refined with Beolink 5000: all record buttons were grouped in the recess; you could address two video recorders, and no matter which one you used, you had direct access to start or stop of the recording and to make a record 'return'.
Beolink 5000 Remote Controller Product Specifications
Types:
1531: (1991 - May 1993)
(MK II) 1620: (1992)
(MK II) USA 1623: (1992)
USA 1534: (1991 - May 1993)
Batteries: 3 x AAA
Weight: 240g (with batteries)
Dimensions: 25,5 x 3,7 x 1,9cm
Related Products
- BeoVision MX 5500
- BeoSystem 4500
- BeoCenter 9500
- BeoCord VX5000 VHS VCR
- BeoCord VX5500 VHS VCR
- Beolink 1000 Remote Controller
- Beolink 7000 Remote Controller
Created: 12th January 2007
Modified: 20th February 2007
Author Notes:
Have a Beolink 5000 Mark II that you don't know how to set up as a one-way or two-way unit?
Put the system into standby by pressing the 'off' switch for > 2 seconds and press SHIFT and then MENU. Just follow the instructions on the transparent screen!
To check the software installed on your Beolink 5000:
Press the 'off' dot at the bottom of the remote control for > 2 seconds to put the system into stand-by. Press MENU to give a 'Terminal Setup?' reading. Step down to show the version of software installed and then STOP to take you out of the Menu operation.


